To do this I need to sort out the problems that I have had with my original Photos:
- Trying to hold the diffraction grating flat and not have it bend when taking the photos.
- Trying to have a background that doesn't wash out the colour of the rest of the spectrum (black) with out having the light from the spectrum being too bright and wash out the colour in it when taking photos with a not very advanced camera.
- Cutting down the light that is subsequently split so that the spectrum is more easily recognised.
For this I am using a 1000 line/mm diffraction grating slide so I drew around the outside and inside of this on the other end of the box, since I am planning to create the ability to change slides (500 line/mm and 532 line/mm twin axis are also available). I cut out the area that corresponds to the inside of the slide (where the diffraction grating is). This has to be cut out of both of the layers of flaps on this end of the box so that you create a hole that the light can go through.
Additionally I then built up a 'holder' that would keep the slide in place by layering two sections of cardboard up, the lower one which lines up with the outside of the slide and the top layer that overlaps this.
Once this has been built the fine tuning needs to be done so that all the extraneous light is blocked out and is only received to the grating from the slit in the end of the box. To do this I used electrical tap to cover up the corners of the box, where light was making its way in.
After this you can look through the grating to see the spectrum of a light source. To do this you aim the slit at a light source and look into the 'hole'.
If you have cut the hole directly in line with the slit then you will need to hold the apparatus at a slight angle to be able to see the spectrum that is given off.
Uses of the Spectrograph:
Not all light that looks 'white' is the same. Looking through the spectrograph at a light source will give off a specific spectrum, for example looking at sunlight will produce a continuous 'rainbow' spectrum, which is very similar to the spectrum given off from an incandescent bulb in the visible wavebands.
* Our eyes can only pick up a specific part of the whole spectrum and sunlight is made up of a lot more of the 'invisible' parts of the spectrum than incandescent bulbs are. For example UV radiation is present in sunlight but not in bulbs, hence why we tan outdoors but not indoors*
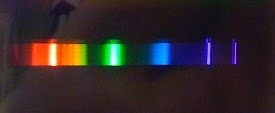
Here is the spectrum given off by an incandescent bulb, photographed with the spectrograph that I made earlier in the day. This has been taken with my iPhone, which explains why the quality isn't perfect.

A few more photos are on Picasa Web Albums and more will be added as they are taken (hopefully with the better camera, and of more light emissions)
No comments:
Post a Comment