Trying to find a decent torch that can be used by my friend who is a marine engineer is proving to be a bit more of a challenge than first thought.
The criteria are that it is:
Tough - it needs to be able to withstand a fair amount of grief,
Waterproof - it will come into contact with a fair amount of water and oils.
Small enough to fit in boiler suit comfortably - not be too heavy or large.
Be able to use rechargeable batteries with out loosing brightness.
With this in mind I thought that an LED torch would be a good idea but having spoken to him again recently he claims that white LEDs have a higher green light content than normal bulbs and that this makes it harder to detect contrast, so I have decided to be pedantic and test this.
I plan to try and get images of the spectrum of the typical bulbs found in normal torches and then the spectrum of common white light LEDs and see if there is any difference and if there specific makes of LED that are closer to 'normal' light which would make for better bulbs in torches. Additionally if I have time to look into filtering the light to make it into a better spectrum for use in detecting contrast etc.
To be continued...
02 November, 2010
16 August, 2010
'Home Made' Spectrograph
Today I am still playing around with the diffraction grating and working out how to create the typical spectral lines that you expect when looking into the spectra.
To do this I need to sort out the problems that I have had with my original Photos:
For this I am using a 1000 line/mm diffraction grating slide so I drew around the outside and inside of this on the other end of the box, since I am planning to create the ability to change slides (500 line/mm and 532 line/mm twin axis are also available). I cut out the area that corresponds to the inside of the slide (where the diffraction grating is). This has to be cut out of both of the layers of flaps on this end of the box so that you create a hole that the light can go through.
Additionally I then built up a 'holder' that would keep the slide in place by layering two sections of cardboard up, the lower one which lines up with the outside of the slide and the top layer that overlaps this.
Once this has been built the fine tuning needs to be done so that all the extraneous light is blocked out and is only received to the grating from the slit in the end of the box. To do this I used electrical tap to cover up the corners of the box, where light was making its way in.
After this you can look through the grating to see the spectrum of a light source. To do this you aim the slit at a light source and look into the 'hole'.
If you have cut the hole directly in line with the slit then you will need to hold the apparatus at a slight angle to be able to see the spectrum that is given off.
Uses of the Spectrograph:
Not all light that looks 'white' is the same. Looking through the spectrograph at a light source will give off a specific spectrum, for example looking at sunlight will produce a continuous 'rainbow' spectrum, which is very similar to the spectrum given off from an incandescent bulb in the visible wavebands.
* Our eyes can only pick up a specific part of the whole spectrum and sunlight is made up of a lot more of the 'invisible' parts of the spectrum than incandescent bulbs are. For example UV radiation is present in sunlight but not in bulbs, hence why we tan outdoors but not indoors*
Here is the spectrum given off by an incandescent bulb, photographed with the spectrograph that I made earlier in the day. This has been taken with my iPhone, which explains why the quality isn't perfect.
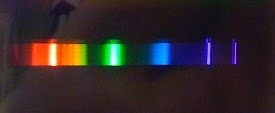
 Here is the same set up but taking a photograph of the spectrum given off by an energy saving bulb. Notice how the spectrum is no longer continuous but is made up of strong signals at specific wavelengths.
 Other interesting Lights to look at range from, Sodium street lights, fluorescent lights, LEDs the list is endless, Also if you are very careful you can look at the spectrum given off by different flames (but please take care when doing this)
A few more photos are on Picasa Web Albums and more will be added as they are taken (hopefully with the better camera, and of more light emissions)
To do this I need to sort out the problems that I have had with my original Photos:
- Trying to hold the diffraction grating flat and not have it bend when taking the photos.
- Trying to have a background that doesn't wash out the colour of the rest of the spectrum (black) with out having the light from the spectrum being too bright and wash out the colour in it when taking photos with a not very advanced camera.
- Cutting down the light that is subsequently split so that the spectrum is more easily recognised.
For this I am using a 1000 line/mm diffraction grating slide so I drew around the outside and inside of this on the other end of the box, since I am planning to create the ability to change slides (500 line/mm and 532 line/mm twin axis are also available). I cut out the area that corresponds to the inside of the slide (where the diffraction grating is). This has to be cut out of both of the layers of flaps on this end of the box so that you create a hole that the light can go through.
Additionally I then built up a 'holder' that would keep the slide in place by layering two sections of cardboard up, the lower one which lines up with the outside of the slide and the top layer that overlaps this.
Once this has been built the fine tuning needs to be done so that all the extraneous light is blocked out and is only received to the grating from the slit in the end of the box. To do this I used electrical tap to cover up the corners of the box, where light was making its way in.
After this you can look through the grating to see the spectrum of a light source. To do this you aim the slit at a light source and look into the 'hole'.
If you have cut the hole directly in line with the slit then you will need to hold the apparatus at a slight angle to be able to see the spectrum that is given off.
Uses of the Spectrograph:
Not all light that looks 'white' is the same. Looking through the spectrograph at a light source will give off a specific spectrum, for example looking at sunlight will produce a continuous 'rainbow' spectrum, which is very similar to the spectrum given off from an incandescent bulb in the visible wavebands.
* Our eyes can only pick up a specific part of the whole spectrum and sunlight is made up of a lot more of the 'invisible' parts of the spectrum than incandescent bulbs are. For example UV radiation is present in sunlight but not in bulbs, hence why we tan outdoors but not indoors*
Here is the spectrum given off by an incandescent bulb, photographed with the spectrograph that I made earlier in the day. This has been taken with my iPhone, which explains why the quality isn't perfect.


A few more photos are on Picasa Web Albums and more will be added as they are taken (hopefully with the better camera, and of more light emissions)
12 August, 2010
Fixing Nicrome Wire to use as a Cutting Edge
So this post doesn't come with any colourful pictures but is a problem that I have come across at work recently and have had to put my mind into coming up with an answer and then the more complicated problem of trying to communicate this to other people.
Nichrome wire is a wire that is often used for its property that when you put a current along its length it will heat up, it is used in heating elements and also for the cutting of polystyrene such as in the making of ceiling tiles or just to cut interesting shapes out of this easily accessible material.
But how do you secure a hot wire enough to apply a current to it and to then keep it under enough tension to use to cut through polystyrene?
Since when a current is applied to the wire it will heat up and this can cause the wire to expand and so any length that has been fixed at both ends would end up being loose and would not cut a straight line.
So the challenge is to secure the wire and apply a current to it in a way that allows the tension on the wire to stay constant as its length changes. Here the application of a tensioning device such as a spring is an obvious choice but applying the current to this set-up is an interesting problem.

Securing the wire at one end and then using a spring at the other end of the wire will keep the wire under tension and securing the power input ‘inside’ of these two fixings will mean that the fixings are not part of the circuit and will only be receiving heat from transfer down the wire.
Using this method the wire itself is secured and then the current is applied in a second connection. This could be improved by additionally supporting the wire so that when there is tension on the wire from cutting the polystyrene this doesn’t relay back to the fittings and twist these at all. To add this extra precaution the wire should be lead around a set of bearings.

When using this method it is possible to add the current to the system at the point of the pulleys but if this is done special consideration must be made to make sure that they still rotate other wise the wire will be worn through as it expands and contracts rubbing against the turning point.
11 August, 2010
Photos of Light spectrum through diffraction grating
In addition to my Polarising film set up I am trying to create a set up to show how light is split when passing through diffraction grating. So I picked up a grain of wheat bulb and set about trying to work out how would be best to show this.
Unlike my polarising film photos the set up was not already created, so these photos are from my first round of trials and there will be more when I have managed to incorporate the modifications that showed to be necessary from this round.
I did initially try a round of photos with an E10 bulb and a white background but this was too large a light source and the white background meant that it washed the colour out of the spectrum and provided problems when trying to clean up the images.
So my first modifications resulted in using a black table as a background and taking the photos in the dark (except for the bulb) to reduce the amount of background light, and using a grain of wheat bulb since this would produce a much smaller light source.
I am yet to decide if taking photos in a dark room is a good idea or not since when the light source is in the photo it 'burns out' due to being so much brighter than the surrounding image.

This image shows how bright the light is but also shows the colours produced quite well.
This was only the second photo I took with this set-up and here I will have to apologise for the quality of the photos since it was only a trial they are only taken using my iPhone camera.

This shows how the main part of the spectrum is 'burnt out' since it it much brighter but it also shows the range of colours that the light produces and shows the start of a second 'tail' out side of the initial spectrum. Here the light source is to the left of the image.
Another problem that shows up on some of these images in that the Diffraction Grating that I used was just held by me in one hand so it had a tendency to bend resulting in bent spectrum lines this will be rectified in future photography sessions by mounting the diffraction grating before using it. I will also mount the camera since these images are taken in the dark resulting in a long exposure time so to create a higher quality photograph mounting the camera would reduce the blur created by movement of the camera.
The first set of images were taken with either 500 or 1000 lines/mm Single Axis Diffraction grating but I also had 532 lines/mm Twin-Axis Diffraction Grating to play about with and this produced some much more interesting images

Here the spectrum is split as it was before but due to the diffraction grating having two axis the light is split in many directions producing this interesting star effect.
To view more of the initial photos see them here
Unlike my polarising film photos the set up was not already created, so these photos are from my first round of trials and there will be more when I have managed to incorporate the modifications that showed to be necessary from this round.
I did initially try a round of photos with an E10 bulb and a white background but this was too large a light source and the white background meant that it washed the colour out of the spectrum and provided problems when trying to clean up the images.
So my first modifications resulted in using a black table as a background and taking the photos in the dark (except for the bulb) to reduce the amount of background light, and using a grain of wheat bulb since this would produce a much smaller light source.
I am yet to decide if taking photos in a dark room is a good idea or not since when the light source is in the photo it 'burns out' due to being so much brighter than the surrounding image.
This image shows how bright the light is but also shows the colours produced quite well.
This was only the second photo I took with this set-up and here I will have to apologise for the quality of the photos since it was only a trial they are only taken using my iPhone camera.
This shows how the main part of the spectrum is 'burnt out' since it it much brighter but it also shows the range of colours that the light produces and shows the start of a second 'tail' out side of the initial spectrum. Here the light source is to the left of the image.
Another problem that shows up on some of these images in that the Diffraction Grating that I used was just held by me in one hand so it had a tendency to bend resulting in bent spectrum lines this will be rectified in future photography sessions by mounting the diffraction grating before using it. I will also mount the camera since these images are taken in the dark resulting in a long exposure time so to create a higher quality photograph mounting the camera would reduce the blur created by movement of the camera.
The first set of images were taken with either 500 or 1000 lines/mm Single Axis Diffraction grating but I also had 532 lines/mm Twin-Axis Diffraction Grating to play about with and this produced some much more interesting images
Here the spectrum is split as it was before but due to the diffraction grating having two axis the light is split in many directions producing this interesting star effect.
To view more of the initial photos see them here
10 August, 2010
Fun with Polarising Film...
Polarising film is an interesting material to play around with since it can produce amazing patterns and colours when combined with the right materials.
At work we have a light box that is fitted out with a square of polarising film the same size and the top of the box, this produces a polarised light source. Normally this light box is used in conjunction with a sheet of clear plastic covered with strips Selotape (cellulose tape) at different angles, which produces many varying colours due to the interaction of the natural bio-refringent properties of the tape and the polarised light, to see the effect of this you need to be looking through an additional sheet of polarising film.
Here is an image taken with this set-up:

The polarising properties inherent in the tape also occur naturally in minerals such as mica. Removing the Selotaped layer and replacing it with chips of mica produced similar results, with the main difference that it was possible to see different colours in one chip meaning that the polarising properties could change across one chip where as with the tape the only variation was the angle of the tape. In the mica the changes are to do with angle and also the thickness of the layer and how the minerals were layed down.
This image shows the change in colour between different chips and across the same chip:

Here is a close up of an individual chip showing its variations:

Additionally this polarising film set-up can be used to show the stress patterns occurring in plastic objects. Using this set-up I have looked at clear plastic ruler and a clear plastic drawing pin. When looked at with polarised light and a polarised filter the stress patterns evident in the material show up as changes in the colour of light. In these images the stress patterns are ones inherent to the plastic and were set into the objects as they cooled, but it is possible to show instantaneous stresses caused by the bending of plastics this way too.
Here are the stress patterns in a plastic ruler:

And the stress patterns in Plastic Drawing Pins:

For additional pictures taken during this session please see: here
Many thanks to www.Greenweld.co.uk for the Polarising Film and Mica chips, Check them out!!
At work we have a light box that is fitted out with a square of polarising film the same size and the top of the box, this produces a polarised light source. Normally this light box is used in conjunction with a sheet of clear plastic covered with strips Selotape (cellulose tape) at different angles, which produces many varying colours due to the interaction of the natural bio-refringent properties of the tape and the polarised light, to see the effect of this you need to be looking through an additional sheet of polarising film.
Here is an image taken with this set-up:

The polarising properties inherent in the tape also occur naturally in minerals such as mica. Removing the Selotaped layer and replacing it with chips of mica produced similar results, with the main difference that it was possible to see different colours in one chip meaning that the polarising properties could change across one chip where as with the tape the only variation was the angle of the tape. In the mica the changes are to do with angle and also the thickness of the layer and how the minerals were layed down.
This image shows the change in colour between different chips and across the same chip:
Here is a close up of an individual chip showing its variations:
Additionally this polarising film set-up can be used to show the stress patterns occurring in plastic objects. Using this set-up I have looked at clear plastic ruler and a clear plastic drawing pin. When looked at with polarised light and a polarised filter the stress patterns evident in the material show up as changes in the colour of light. In these images the stress patterns are ones inherent to the plastic and were set into the objects as they cooled, but it is possible to show instantaneous stresses caused by the bending of plastics this way too.
Here are the stress patterns in a plastic ruler:
And the stress patterns in Plastic Drawing Pins:
For additional pictures taken during this session please see: here
Many thanks to www.Greenweld.co.uk for the Polarising Film and Mica chips, Check them out!!
Subscribe to:
Posts (Atom)